BLOGGER TEMPLATES AND TWITTER BACKGROUNDS

Friday, September 11, 2009

September 8-11: Apples!

We spent this week learning about apples. Sorry for the lack of lesson plan, but I've had a lack of energy this week. I will try to post some of our other activities later this weekend, but I thought I'd share a few art projects we did.


Apple Cut out project

Materials: construction paper, markers, crayons or paint in apple colors
Activity: Trace out an apple shape onto your construction paper. For younger children cut the shape, for preschool age children allow them to cut the shape themself. Have children color or paint their apple. This is a great time to talk about the different colors of apples. Add details- such as stem and leaf. I added the letter A to the apple since that was a focus letter for us this week.

A is for Apples!

Materials: Construction paper cut outs of apples and a big letter A and glue sticks
Activity: Have the children paste the apples to the letter A, focusing on the fact that Apple starts with A and the sound of A.


Fingerprint Apple Tree

Materials: Green construction paper, brown construction paper, red paint, scissors and glue stick
Activity: Either pre-cut or have your child cut out a tree top and trunk. Use the glue stick to appropriately assemble the pieces. Using their finger your child with print apples onto their apple tree. Great project to do when introducing the Apple Tree Fingerplay.

Thursday, September 3, 2009

My Name Painting


Materials: construction paper, paint, paint brushes, and contact paper or masking tape
Activity: To prep, cut out letters of your child's name from contact paper and stick onto construction paper. If you don't have contact paper, you can use masking tape to form the letters. Next, have your child paint over the letters. Once dry peel up letters and your child's name will be left in the paint.

Tuesday, September 1, 2009

September 1: Letter A coloring page, Finger painting and Crunch Munch Mix

Letter A coloring page: Today we have introduced letter A and colored a letter A coloring sheet. The sheets I use are very basic. Today's paper had a large apple picture and the letter A at the top. I am using very basic sheets because the kids I am working with are 2 years old. For older children, you can use sheets where they may trace or attempt to write the letter on their own. For my purposes, I am using the sheet as a basic introduction to upper case letters and to expand vocabulary words.

Some resources for finding alphabet pages:
Alphabet Coloring Pages
DLTK Alphabet Coloring pages (variety)
ABC Printing Pages
Alphabet Activities (various printables)
First School Alphabet activity pages

*There are lots of resources out there for alphabet learning. If you have a link you'd like to share, please post it in the comments section. Thanks!

Finger Painting
Materials: paint, paper, fingers
Activity: Kids use fingers to paint on paper. You can also tailor this to go with theme(s) you are currently working with. Example: If you are doing apple activities you can finger paint with red, green and yellow for apple colors.

Crunch Munch Mix:

Ingredients: banana chips (i broke these up so they wouldn't be a choking hazard), chocolate chips, cherry craisins, cinnamon graham goldfish, banana nut cheerios, and almond slivers.
Directions: Put 1 cup of each ingredient into a big ziplock (1 for each child) and have them shake. Eat some as a snack and save the rest to take home or eat later! :)

Other things we are doing today:
Singing "Head and Shoulders, Knees and Toes" and reading accompanying book.
Discussing parts of our bodies and reading Pooh Has Ears.
Counting out 5 red m&ms for our after lunch treat (and to practice our rational counting).
Taking photos for our All About Me! booklets.

Happy Learning!

September 1-4: All About Me

This week we will be learning about ourselves. Specifically our activities will focus on our names, feelings, and bodies. We will also focus on the letter A and the number 1.

Books:

Head, Shoulders, Knees and Toes by Child's Play
Pooh Has Ears by Ann Braybrooks
Pooh's Bathtime Bubble Book: Feelings
Smile!
by Roberta Grobel Intrater

Circle Games:
*Sing: "I Am Special"
*Talk about parts of our bodies
*Sing: "If You're Happy and You Know It!"
*Talk about happy and sad
*Apple Fingerplay

Art Projects:
*Finger painting
*trace and color our bodies
*my name project
*hand and foot prints
*apple project

Literacy and ABCs:
*Introduce letter A and color a letter A coloring page
*Create "All About Me" booklets
*Letter A cut out craft
*What we can do with our hands/feet
*A is for Apples

Math and 123s:

*count out 5 m&ms
*Only 1 me!!
*circle project
*number 1 coloring page
*count 5 apples for apple project


Tuesday, June 9, 2009

Blog Break

Just wanted to let everyone know that I will be taking a blog break until mid-July. We will be moving in the next 10 days and we just have so much to do. Then we will be having my son's bday party and vacationing in Disneyworld. See you all in a few weeks!

Tuesday, May 19, 2009

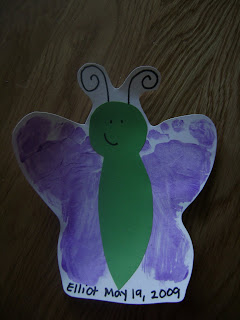
Footprint Butterfly


Materials: Paint, white paper, colored construction paper, black marker, glue stick
Activity: Paint your child's feet and then print each foot on the opposite side of the paper leaving space for the "body" of the butterfly. Create the body of the butterfly out of colored construction paper and glue between the 2 wings. Add details using your black marker. Older children could decorate the body of the butterfly or add patterns to the wings.

Monday, May 18, 2009

Monkeys and Shapes!

Two of my son's favorite things are monkeys and singing the song "Twinkle, Twinkle, Little Star". We've been doing some activities based on these interests lately! Magnetic Monkeys: I copied 5 monkeys, colored them and then laminated and put magnets on the back. I made corresponding number cards. We sing the 5 monkey song and take one away as each falls of the bed, as well as the highest number. My son is really into counting right now, also. So often we put the cards up or count the monkeys out.
Jumping Monkeys: This is an activity that they do at our library story hour. They give each child a stuffed monkey and have the child make their monkey jump as they sing the song. You can put this on a CD or just sing it. We like to put on the CD and jump along with our monkeys.
Shape Matching: This game helps with identifying shapes, hand eye coordination, and one to one correspondence. All I did was create a "mat" with shapes on it. I kept it simple at 4 shapes, but you can include whichever shapes you want. Then make a matching shape to use as your "piece". Your child will match each shape to the one on the mat. While playing this with your child you want to be saying the name of the shape (and colors too!).
Twinkling Stars: Nothing is as fun for a little one as something hands on. That's why I created these twinkling stars for my son. We simply use these when we sing "Twinkle Twinkle" and wave them in the air. A simple activity that is really a favorite with my little guy.

May 18-22: Caterpillars and Butterflies

Sorry it has been so long since my last blog update. Things have been very busy around our house since the weather got warm!

Book: The Very Hungry Caterpillar by Eric Carle

Fingerplay:

The Caterpillar
The fuzzy little caterpillar went up into a tree(act like your climbing)
spun his cocoon and then (yawn)went to sleep (spin hands)
While he was sleeping he dreamt that he could fly (making flying motion)
When he woke up (loud, excited) he was a butterfly.

Vocabulary: butterfly, caterpillar

Art activities:
*
egg carton caterpillar
*footprint butterfly
*circle caterpillar
*coffee filter butterfly
*mirror image butterfly

Other activities:
*
hungry caterpillar fruit salad
*butterfly life cycle pasta project
*
feeding the hungry caterpillar

Helpful links:
literacy and ABC butterfly and caterpillar themed activities
hungry caterpillar emergent reader
information on creating your own butterfly garden

Tuesday, April 7, 2009

Exciting Eggs!


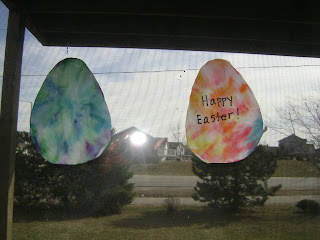
Tye Dye Easter Eggs

Materials: Coffee filters, markers, spray bottle
Activity: Cut coffee filters in egg shape. Color with markers. Spray with with water once finished coloring. Allow to dry.


Collage Egg

Materials: construction paper, collage materials (scraps of paper, sequins, buttons, pom poms, anything you can think of really!) and glue
Activity: Cut your construction paper into an egg shape. Have your child color the egg if desired. Then have them glue on collage materials. Allow to dry.

Bunnies and Eggs!

I'm not doing a lesson plan for this week, but we will be doing some bunny and egg crafts and projects for easter so I will post photos and directions. Enjoy!


Thursday, March 26, 2009

Turtle Mobile


Materials: toilet paper roll, ribbon, white turtle cut outs (from construction paper or cardstock), paint, crayons or markers

Activity: Paint your toilet paper roll and allow it to dry. Next, color your turtle cut outs green and brown. Poke a hole in the center of each turtle and thread your ribbon through tying a knot on one side. Poke a line of holes in your tp roll and thread the other end of the ribbon into it and secure with a knot. Using some of the ribbon tied around the top to form a way to hang your mobile as shown in the photo.

Rainbow Fish


Materials: Fish cut out of construction paper, rainbow variety of paints, foil, wiggle eye (or marker to draw eye)

Activity: Have your child paint the rainbow fish many colors. Once dry glue on small squares of foil and draw eye or glue on wiggle eye.

Darling Ducks

Thumbprint Ducks

Materials: Yellow paint, orange and black marker or crayon, white paper

Activity: Use your thumbprint and your child's to make the body of the duck. Once dry use the orange and black markers to add details to your ducks as shown in the picture.


Paper Plate Duck

Materials: paper plate, yellow paint, orange and yellow construction paper, glue, wiggle eye

Activity: Paint the paper plate yellow. Once dry fold in half. Out of the yellow and orange construction paper make head, beak and feet of duck and glue to paper plate (which should be folded in half as shown). Glue wiggle eye on to complete.

Monday, March 23, 2009

Updating

I just wanted to say sorry for my terrible lack of updates this week. I will be back later today to finally update. The beautiful weather and house hunting have taken over my life this week! But it's a rainy day, so perfect day to finally get my blog caught up again. :)

Sunday, March 15, 2009

March 15-27: Pond and Ducks

I'm going to be doing the pond/duck theme for 2 weeks because I have so many ideas to go with it that I can't fit it all into just 1 week. :)

Books:
Little White Duck by Walt Whippo, Over In the Meadow by Ezra Jack Keats, Turtle Splash: Countdown at the Pond, Fish is Fish by Leo Lionni, 5 Little Ducks Little Scholastic and/or Raffi, Down By the Cool of the Pool by Tony Mitton, In the Small, Small Pond by Denise Flemming, The Rainbow Fish by Marcus Pfister

Songs:
5 Little Ducks (words with printable sheet)
5 Green and Speckled Frogs (words)

* both of these songs also make great activities for magnet, felt board or glove puppets

Vocabulary: duck, fish

Art activities:
*feather painting
*turtle mobile
*turtle bowl craft
*paper plate duck
*thumb print ducks
*rainbow fish
*frog puppet
*duck nests

Other activities and games:
*eggs and nest number game
*lily pad jump
*cardboard box turtle
*water table pond
*frog food
*flies on a log

Printables and other resources:
Who lives in the pond printable book by scholastic
Little White Duck Printables
Frog Themed Printables

****TUESDAY ST. PATTY'S DAY ACTIVITIES: (now that I actually have the right week!)

Art Project:
Handprint shamrocks

Other Activities/Printables:
M & M rainbow sorting activity
Printable book by Scholastic
Shamrock Alphabet Match
Shamrock/Gold Coin Hunt

Coffee Filter Shamrocks


Materials: Coffee filters, green markers, spray bottle, scissors

Activity: Have your child color the coffee filters using green markers. Once done coloring spray coffee filters with spray bottle (filled with water). I recommend putting a paper towel on a paper plate and putting the filter on the top. The markers will bleed and run, so you need to have something underneath to soak up the running marker. Cut into shamrock shapes.

I suspect foul play...

So just this morning I finally got around to finishing my son's body tracing. I had traced him a couple days ago on a roll of brown packing paper and this morning he painted it. It was so nice out that I put it out on his picnic table to dry and weighted it down with a book. It's not very windy at all, so I left it and it's been fine. I've seen it out the window several times. Well, I put my son down for his nap and was in my bedroom for about an hour when I decided to go check if the painting was dry. I went out... and the painting is GONE! I searched all around the yard and path behind our house. The only thing I could think of is that it blew to the path and someone picked it up trying to be a good citizen. I'm so bummed!! It was too cute. I'm gonna have to redo the project with him sometime soon.

Thursday, March 12, 2009

The Color of Me!


Materials: White paper or colored construction paper that would match your childs eyes, hair and lips, magazines, scissors, glue, crayons or markers

Activity: Either cut 3 squares/rectangles out of white paper and have your child color them the same color as their hair, eyes and lips or cut the squares out of those colors of construction paper. For older children, you can have them look through the magazines for photos that match the colors of the papers or for younger children you can have pictures already cut out and they can sort them out and match them to the correct color. For older children you could also use bigger sheets of paper as they will more than likely enjoy the cutting/gluing process more than toddlers.

Paper Plate Face

Materials: Paper plate, flesh tone crayon, marker or paint, construction paper for your child's hair (or white paper they can color the correct color), wiggle eyes, markers, glue

Activity: First, color (or paint) your paper plate. Next, cut out the inner circle of the plate and cut 2 ears from the rim which you are cutting away. Have your child glue the ears. Next, add your details of your face using markers, wiggle eyes and construction paper.

Wednesday, March 11, 2009

Make it yourself literacy resources


Here are 2 great websites where you can make your own word cards and your own handwriting sheets. These are great for preschoolers (especially those pre kindergartners!) What makes these sites awesome is that you can input your own text and it will generate writing sheets and word cards. So if you are doing letter A you can make a handwriting sheet just for letter A or word cards with letter A words. Enjoy.

Free Printable Word Cards
Free Printable Handwriting Sheets

Edited to add a sample of some word cards I made.

Monday, March 9, 2009

Shamrocks and Rainbows

So apparently I'm trying to skip an entire week, since St. Patrick's day isn't until next week. Haha. Oh well, we still have some activities to do then.

Paper Plate Shamrock

materials: paper plate, green paint

activity: Cut the paper plate to look like a shamrock as shown in the photo. You can use one of the cut out pieces to form a stem. Have your child paint it green. We used this cool paint dabby thing that I got at Michael's recently. They came in a 4 pack for $9.99. Very fun.


Rainbow


materials: rainbow cut out of white paper, rainbow color of crayons or markers, cotton balls (optional)

activity: Have your child color their rainbow with all the rainbow colors. For older children, try to encourage them to make the arc of the rainbow. On the clouds you can add cotton balls if desired.


Shamrock


materials: shamorck cut out of white paper, green crayons and markes, green glitter (optional)

activity: Have your child color their shamrock green. Use glitter around the edge to decorate, if desired. Give to a special friend for luck!


Foot Paiting and The Shape of Me!!

The Shape Of Me!

materials: brown bag or construction paper, markers or crayons, photo of your child, magazines to cut out things your child likes

activity: Cut out a "person" shape from your brown bag or construction paper (sorry, I do not have a pattern for this one because I just drew it, but you could probably do a google search for one). Have your child color the cut out. Once they are done have them go through the magazines to find things they like (of course for younger children you will need to help with this step). Have them glue the things they like onto their body shape.


Foot painting

materials: brown bag or large piece of paper (you could use the back of wrapping paper also- the white side), paint

activity: What I did was cut the paper bag so it was like one long strip (so basically i cut off the bottom and cut it down the side). Then I put it in the bottom of our bathtub. I put a paper plate with 2 colors of paint on each into the tub. I had my son step one foot in each color and then walk on the paper. As you can see from the photo I ended up cutting off about 1 side of the bag, because my son was not too thrilled with this activity. I just think he wasn't in the mood for it and wanted to take a bath more than anything. Afterwards I just ran the bath and he was clean. It's the easiest way to do this! :)

Saturday, March 7, 2009

March 9-13: My Body

We will be learning about bodies and their parts this week!! We will start on Monday, but take a break on Tuesday for St. Patrick's Day activities.

My Body Theme
Songs: Head and Shoulders, Knees and Toes; Hokey Pokey
Books: Books: Where is Baby's Belly Button by Karen Katz; Toes, Ears and Nose! by Karen Katz; Horns to Toes and In Between by Sandra Boynton; Parts by Tedd Arnold (Also there is More Parts and Even More Parts); From Head to Toe by Eric Carle; I Like Me! By Nancy Carlson
Vocabulary: Parts of the body (eyes, nose, mouth, hair, etc)

Art Projects:
body tracing
painting with feet
paper plate face
marble painting veins
the shape of me
color of me

Other activities:
Mr. Potato Head Activity
measuring me!


Friday, March 6, 2009

Truffula Trees


Here are our Truffula trees. We made them yesterday, but I had to wait for them to dry to "assemble" them. Right now (in the pic) they are just laying on my counter because I can't decide what color of paper to glue them to. I want to put them on paper, so I can hang them up. But I can't make a decision right now. Haha.

Materials: Yellow construction paper, coffee filters, markers, spray bottle, glue
Activity: Give your child a coffee filter and marker and have them color it. Once they are done, place the coffee filter on a paper plate with a paper towel underneath it (under the coffee filter). Have your child spray the coffee filter with water until the color starts to bleed. Allow to dry. (Usually after about 20 minutes or so I take the paper towel out and just put the filter on the plate. I think it dries faster this way.) Use the yellow paper to make trunks of the trees. Glue pieces together when top of tree is dry.

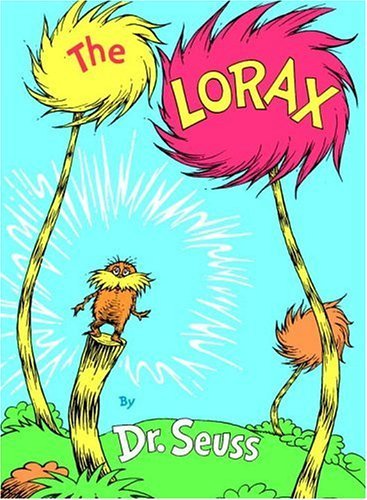
If you aren't familiar with the story the Lorax, it is basically about the Lorax trying to save these truffula trees. It's a great book to go along with an earth day theme or to talk to your kids about recycling or being "green". Another thing we use to do in my classroom is to make a recycle collage. We'd use as many things as possible out of our recycle bin to make collages and pictures. It's a great way to teach that things can be reused, and if they can't recycling them is best.

This activity was inspired by The Lorax.

Thursday, March 5, 2009

Getting Creative with Paint!


I recently bought my son some of those sponges that are on a stick (I think they're intended to be used for stenciling on your walls?) . I thought they looked like fun to paint with and they cost less than 50 cents a piece. I thought I'd give some ideas of different things I have used in the past instead of a paint brush.

sponges
veggies/fruits
hands
feet
q tips
cotton balls
cookie cutters
straws
cardboard tubes
spoons
forks
spools
bubble wrap
eye droppers
spray bottles
cars
marbles
golf balls
toothbrushes
cooked spaghetti
yarn or string
different bottles/cups
bubbles
feathers
fly swatters
dishwashing brushes
toothpicks
loofa/body puff

Also, you can do different types of paint: tempra, watercolors, poster paints. You can add glitter, sand, dirt to add texture. You can add flour or starch to thicken the paint. You can add corn syrup to make it shiny. You can add a little water to make it more liquid.

There are so many options for painting!! Get creative and enjoy!

Starlight Starbright

Our library hands out little maker bags with different activities each week that you can take home and do with your kids. To the left is my take on the maker they had for this week. The makers are usually traditional story or rhyme things (for example: last week was the little kittens who'd lost their mittens). I want to do more of the classic rhymes with my son, so I've been doing these activities with him. This week was the "Starlight, Starbright" rhyme. There was a die cut star (the inner cut out had been removed and they left the outer portion), clear yellow contact paper, and a piece of string. I covered the die cut with the paper so it was like a window effect. Then I cut around the edge of the star. I puched a hole and put the string through the hole. I then wrote the rhyme all around the edge and hung this in my son's room. I was pretty pleased with how this turned out and it will remind me to say the rhyme to him, so he can learn it for himself.

More Dr. Seuss Ideas

Ok, you just have to check out the green egg cookies Bobbi made over at her blog Casa Camacho. She has some SUPER cute ideas that look like so much fun. But you really need to check out her cookies. Very creative. :)

Wednesday, March 4, 2009

Cat in the Hat

I basically just cut and let my son color the parts of this. I had intended on him painting them, but they printed up much smaller than I thought they would. This would actually make a really good stick puppet. I was going to try and enlarge this pattern, but didn't have time. But I hope you guys enjoy and think of something creative to do with it. :)

Patterns:
Head
Hat

Winter Tree

I thought I'd get in one more winter craft/project before the time for "winter" themed things was over (even though this doesn't go with my theme this week).

Materials: blue construction paper (or you could use black), bare tree shape cut out of a paper bag, white paint, q-tip, cotton balls, glue

Activity: Glue your tree to your blue paper. Dip the q-tip into white paint and use to make "snow" on the tree and surrounding paper by dotting on the paint. Use cotton balls to make snow at the bottom of the tree.

Tuesday, March 3, 2009

Dr. Seuss Shape Book


Cat in the Hat Shape Book You can find the pages to this book here. If you have an older child have them color the book themself. If you have a younger child, you can make this book yourself for your child to look at and learn their shapes. I love the Making Learning Fun website, so browse it for other learning ideas for your child! :)

10 Apples Up on Top


Materials: construction paper; green, red, and yellow crayon, marker or paint; photo of your child or a self portrait drawn by them; 10 apples either cut outs or drawn by your child

Activity: Have your child color or paint the apples. If your child is able have them number the apples 1-10 (otherwise you can do this step for them). Cut your construction paper in half lengthwise and glue together the two pieces to make a strip. Glue your child's photo or self-portrait at the bottom of the strip. Have your child glue the apples on top of their head (or if you have a younger child you can help with this step). Display at their level and count the apples as you point to the numbers!

This activity is inspired by Ten Apples Up On Top! by Dr. Seuss

Monday, March 2, 2009

One Fish, Two Fish, Red Fish, Blue Fish


Materials: 4 fish shapes cut out of white construction paper, paint, sharpie, blue construction paper, glue stick

Activity: Write 1, 2, red, blue on each fish as showed above. Have your child paint each fish, 1 and 2 whatever colors you would like and then red and blue appropriate colors. Use your blue construction paper to make a strip (cut in half lengthwise) and you can make it look like waves/water across the top. Glue the fish on (or have your child do so).

Inspired by:


Sunday, March 1, 2009

Goodnight Book


I'm not quite done with this, but wanted to snap a few photos so I could share the idea. I came up with this while reading Goodnight Moon. I thought it would be fun if the goodnight story was
personalized. So I made it Goodnight Elliot. Basically, I'm adding a lot of photos of family. The last page will be a photo of Elliot and it will say "Goodnight, Elliot." Some other ideas for pages are photos of favorite toys, places you visit a lot, friends, your home, or a favorite stuffed animal.

Saturday, February 28, 2009

March 2-6: Dr. Seuss

As some of you may know, Dr. Seuss' birthday falls on March 2nd. In honor of this great children's writer we will be doing activities based off of Dr. Seuss' books and characters this week.

Books: One Fish, Two Fish, Red Fish, Blue Fish; 10 Apples Up on Top; Green Eggs and Ham; The Cat in the Hat; The Lorax

Song: 1-2-3-4-5 Once I Caught a Fish Alive

Art Projects:

1 Fish, 2 Fish project

10 Apples Up on top

Cat in the hat craft

Hand print truffula tree

Other projects/activities:
Make our own cat in the hat themed shape book
Eat green eggs and ham
Play games at Seussville
Dr. Seuss color game

If you never did, you should. These things are fun and fun is good!


Thursday, February 26, 2009

Who Lives At My House


This is one of my favorite project to do with young children. Family themed projects never fail to delight young children, because family is the most important thing in their lives. They love doing activities involving their family and this project is a chance to show who is in your family. I absolutely always love the way this project turns out.

Materials: Paper to make your house out of (I used white cardstock, but you can use construction paper or a recycled
grocery bag or any type of paper you'd like), paint/markers/crayons, sharpie, photos of people who live in your home, glue stick

Activity: You can cut a house shape out of your paper or cut a rectangle and triangle (one for the body of the house and one for the roof). Use your sharpie to write "Who Lives In My House?" at the top on the roof and to draw a door (and windows if you want- I used white paper to create window frames). Allow your child to paint or color the house. My son just did tons of paint colors, but older children might want to make it look more like their real home. Once it is dry cut out the photos of your family and put them in the windows (or create window frames using brown or white paper). Allow to dry. This is another project that I laminated, because I plan on keeping it forever so I want it to last! :)

Family Handprints


Materials: All your family members, a photo of each of you, paint, white construction paper or cardstock (or any color you'd like as long as the hand print will show up), sharpie or pen

Activity: Create a hand print of each of your family members. Once dry glue the photo fo the family member in the center of their palm and write "mommy's handprint" at the bottom (or whoever the hand print belongs t0). I laminated them for durability and put a hole punch at the top of each. I then put them on a binder ring, so Elliot could have them to look at whenever he wants. Another idea is to line them up the way I have in the photo and hole bunch the top and bottom. Connect the pieces with yarn or ribbon and hang. :) This is a fun project because the entire family gets involved!!

Lamination: I use a Scotch Thermal Laminator for laminating my projects. I bought it at Walmart for under $25 and the lamination sheets come in packs of 20- 5x7 sheet for $5 and 8.5x11 for $7. I just wanted to let everyone know about this product because I find it extremely helpful and use it on many projects. It's really useful in book making, flashcard making and making games for your kids. (The laminating sheets also come in smaller sizes like 4x6, and business card size, but I'm unsure of the cost of those sizes because I usually stick to the above mentioned sizes.)

Tuesday, February 24, 2009

Homemade Teddy Bear book


This is a book I created off the rhyme that was posted for the teddy bear theme. I typed (double spaced) the words to the rhyme and printed it. I then cut them into strips to be glued onto the pages. I then cut out teddy bears (5 different patterns is what I used, but you can do that however you want). All you need to do is put the words on the page and the number of teddy beards that go with that page. To create the pages I just used construction paper cut in half length wise. I hole punched and laminated the pages and bound them together with binder rings. Viola! You're own teddy bear book.

Teddy Bear Crafts


(On the left) This was my replacement for the Coffee Teddy Bear (if you remember I said we don't have coffee grounds, because we don't use a coffee maker). I just cut out the bear shape (out of a brown bag) and then my son painted it with brown paint. I cut out a heart and glued it in the middle and wrote "I love you beary much!" on it. (On the right) This was my improvised paper plate teddy bear. I gave Elliot a paper plate and brown marker and had him color it. He also used some crayons, too. Then I just cut the middle circle out of the plate and added the details. My origional plan was to have him paint a large paper plate and then a paper bowl. You would use the bowl as the bear's muzzle and add features using marker or wiggly eyes, etc. Well, I had no paper bowls, and it was a day where I was not about to go out and get them. So we just had to improvise.

Monday, February 23, 2009

brown bear story pieces


I made these magnet pieces for the story Brown Bear, Brown Bear, What Do You Hear? I printed the pieces, colored cut and laminated them. Then I added magnets to the backs. You can use them on a magnet board, cookie sheet or the bottom of your fridge. I got these pieces from kidzclub. They have several story pieces available, but you can do this with any of your favorite stories. This is definitely one of my son's favorite books, and as you can see he can't wait to get his hands on the pieces!!